Northern Lights | Olive Oil Gingerbread
"It was a mighty voice, a woman's voice, but a woman with lungs of brass and leather. Lyra looked around for her at once, because this was Ma Costa, who had clouted Lyra on two occasions but given her hot gingerbread on three."- Northern Lights, Phillip Pullman
It was a mighty voice, a woman's voice, but a woman with lungs of brass and leather. Lyra looked around for her at once, because this was Ma Costa, who had clouted Lyra on two occasions but given her hot gingerbread on three.
Northern Lights
Phillip Pullman
This gingerbread was made close to a month ago - created on a day spent babysitting and the realisation that making batches upon batches of cookies was the best way to entertain little ones. I think there was a particular thrill also, making gingerbread so close to Christmas, the spicy scent of it filling the air as it baked.
Like many I'm sure, I spent the later part of the previous year fixed very closely on the TV show of His Dark Materials. I loved it - the casting was superb and I love how firmly the book was followed. It even inspired me to pick up the books again, I had forgotten how incredible they were - I think I likely finished all three within the month.While the gingerbread made by Ma Costa likely wasn't cut into the shape of people, it was sure to have the strong flavours that this one is filled with. And like hers, this is best enjoyed hot from the oven with a cup of tea.
Olive Oil Gingerbread
Makes approx. 16
Ingredients
1/3 cup extra virgin olive oil
3/4 cup raw caster sugar
1/4 cup molasses
1/4 cup milk
2 cups plain flour + 1 tbsp for rolling out dough
1/2 tsp ground cinnamon
1/4 tsp ground nutmeg
1/4 tsp ground cloves
2 tsp ground ginger
1/2 tsp bi-carb soda
1/2 tsp baking powder
1/2 tsp sea salt
Whisk together the oil and sugar until well combined. Add in the molasses and milk, mixing together as best you can. The oil will be tricky to mix in, but just do the best you can.
Sift all dry ingredients together, adding in the combined wet ingredients. Mix until a stiff dough forms. Flatten the dough a little and wrap in cling wrap - chill for at least an hour.
Preheat oven to 180C, line two baking trays for baking paper and put to the side.
Lightly flour a large surface, roll out the chilled dough till it is around 1cm thick, use any cookie cutter (or even the rim of a glass works well, honestly) you want and cut out the shapes wanted. Bundle the cut off dough together and repeat until all the dough is used.
Using a thin spatula, or the edge of a butter knife, gently place the cut out gingerbread shapes onto the prepared trays. Bake for around 8 - 10 mins.
Leave the cookies to cool on the baking tray for at least 2 minutes, to allow them to harden slightly before transferring them to a wire tray to cool completely. Or do as Ma Coster does and serve them hot!
Raspberry Meringue Tart | Alice's Adventures in Wonderland
"The Queen of Hearts, she made some tarts,All on a summer day:The Knave of Hearts, he stole those tarts,And took them quite away!"- Alice's Adventures in Wonderland
‘The Queen of Hearts, she made some tarts,
All on a summer day:
The Knave of Hearts, he stole those tarts,
And took them quite away!"
Alice's Adventures in Wonderland, Lewis Caroll
When I first moved to Melbourne at the age of 19, I began working at a tiny cafe near my house. Looking back - getting paid $14 an hour and working ridiculous shifts, really wasn't worth it or really that legal unfortunately. However, it did mean that I met a very good friend of mine, Laura. Her and her partner were regulars at the cafe, coming in almost every weekend. When I stopped working there, it was quite sudden and I did not have the opportunity to really say good to anyone - only a few months later though, at a showing of Harry Potter and the Deathly Hallows Pt 2 I spotted Laura, perched outside with a wand ready. We exchanged contact details - and since then, her and her partner have moved to Brisbane, but we've also travelled together and put effort in to make sure that we see most Marvel movies together.

She is also a absolutely huge Alice in Wonderland fan, and this year I planned an Alice in Wonderland Tea Party for her when she was down visiting. A weekend of op-shopping and cooking ensured that I put together a tea party that would make the Mad Hatter proud and leave all guests tumbling down the rabbit hole.Despite theming the whole tea party around Alice in Wonderland, I sort of missed out on making what I really wanted to, the Queen of Hearts' tart. So, obviously the solution was to wait till a rainy night months later to attempt to make it.
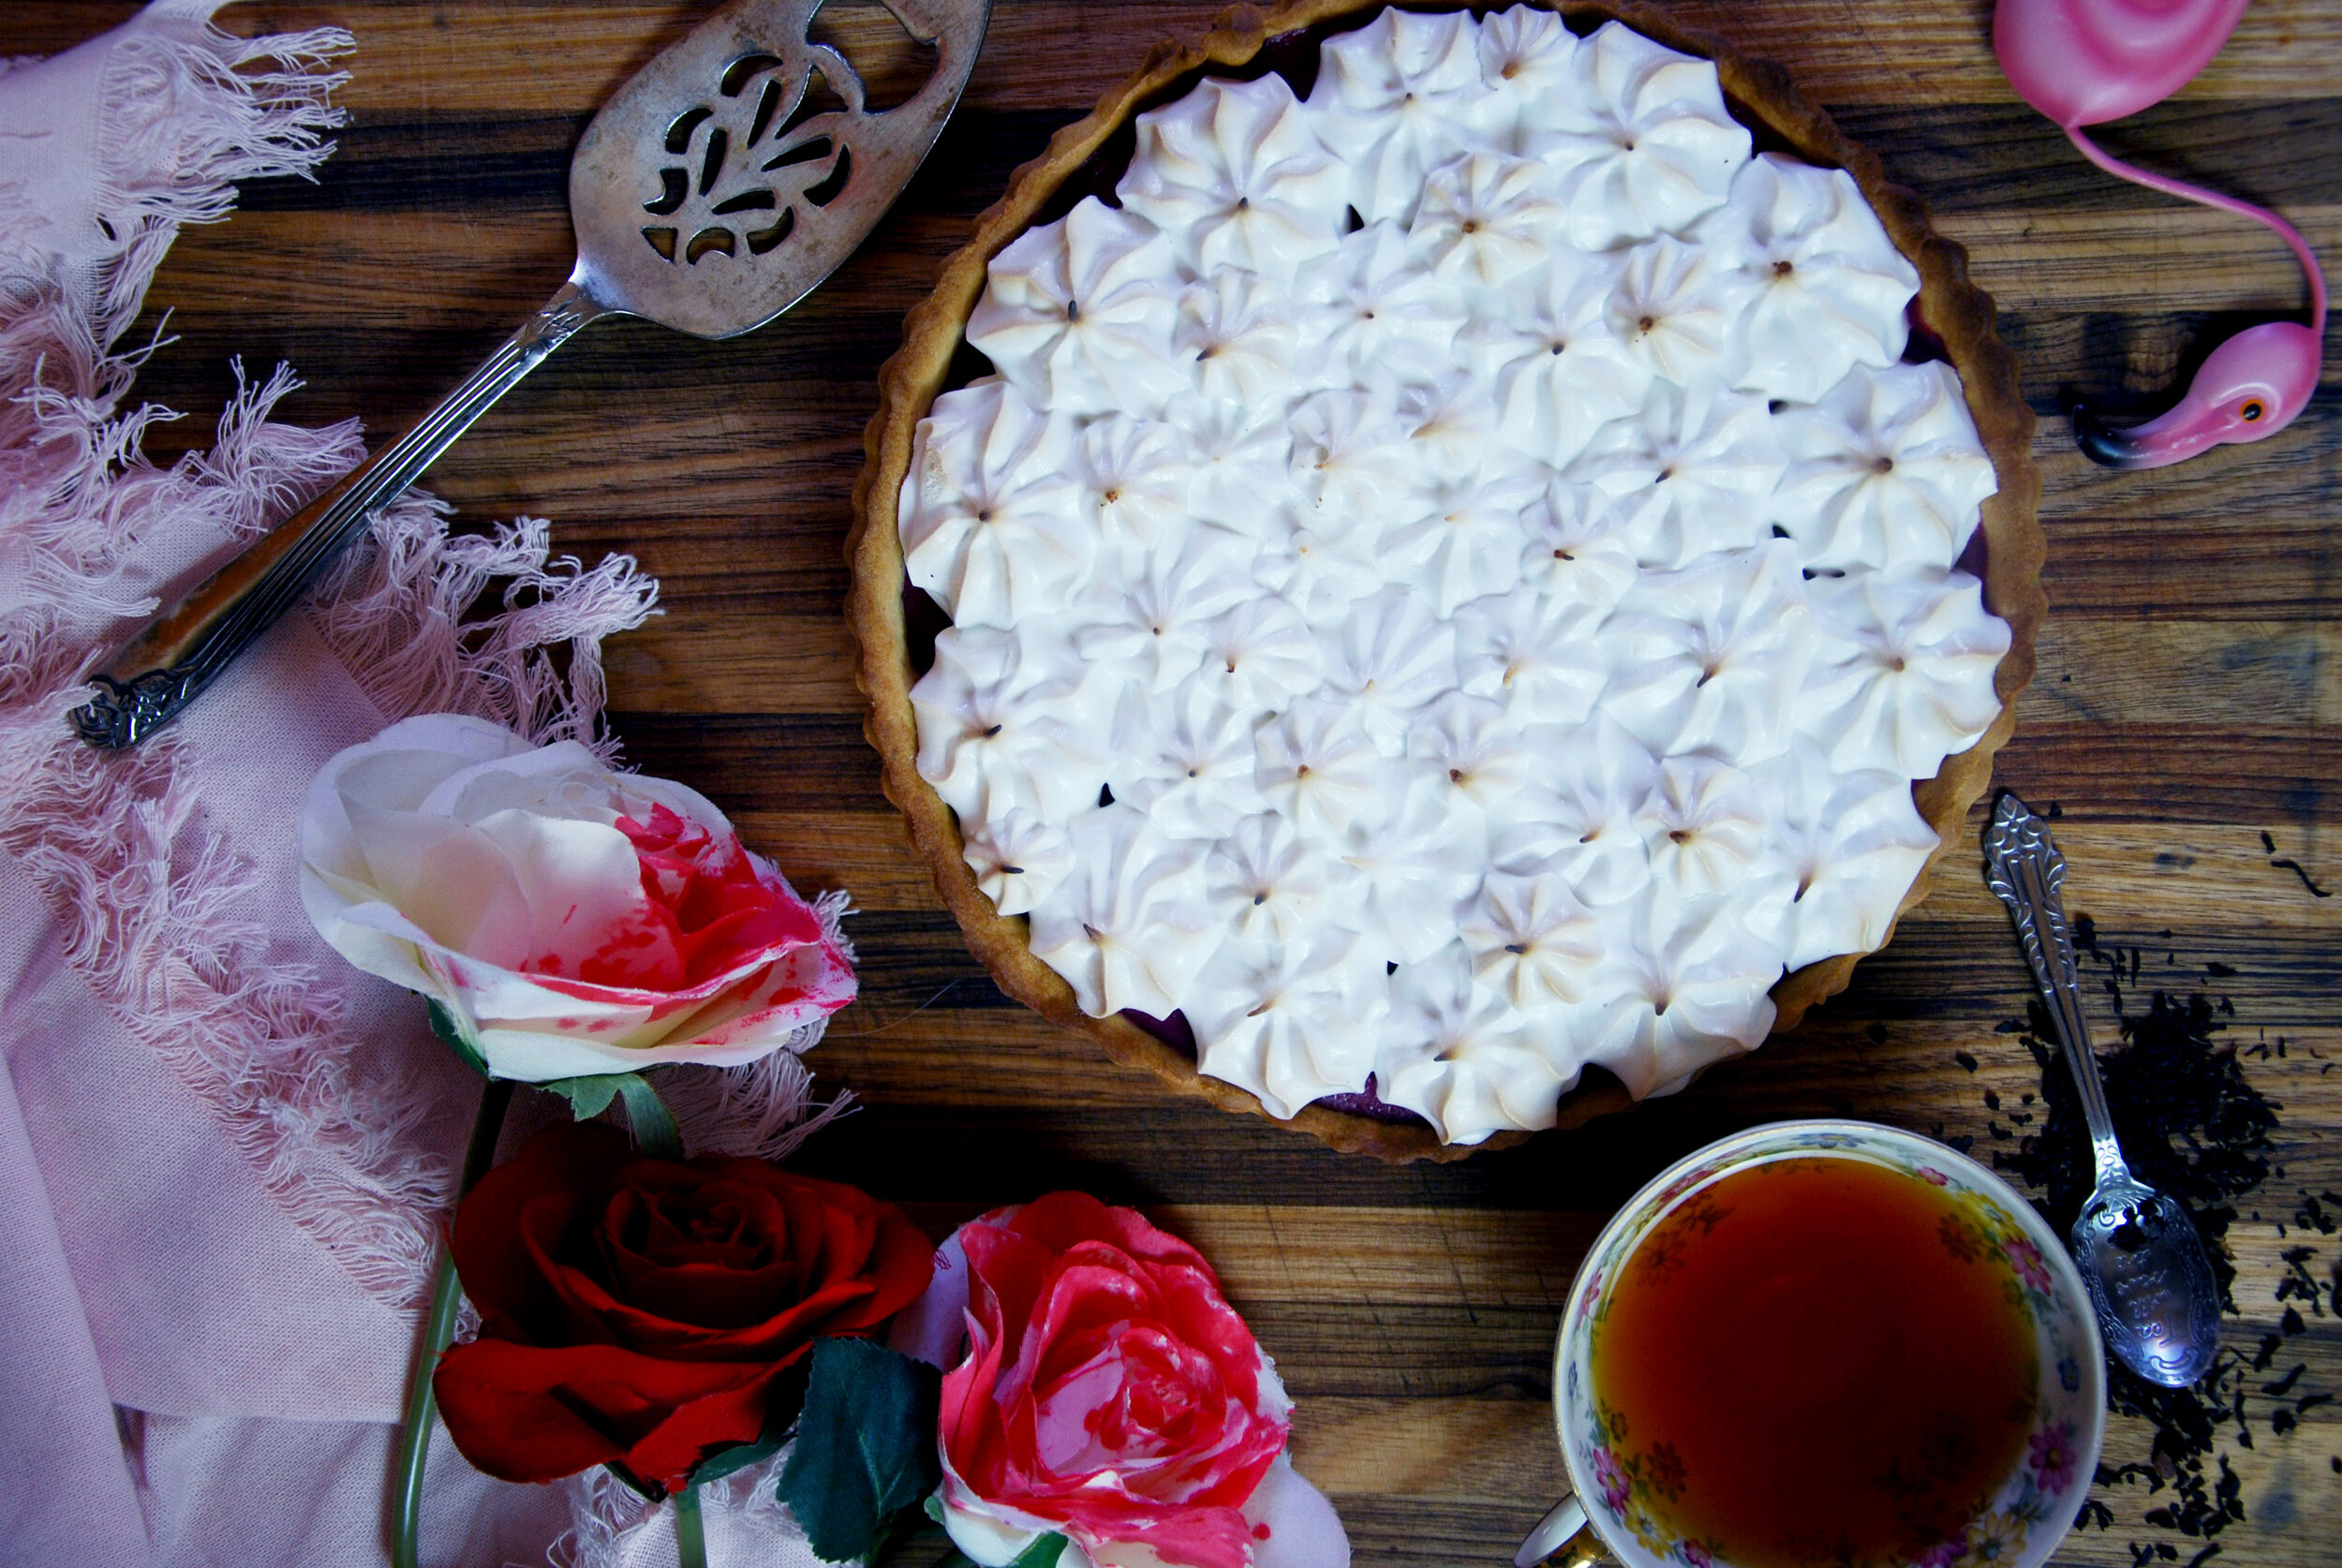
You will need a 25cm tart case and ideally a candy thermometer and a standmixer/electric beater but can be done without. You can use this method if you don’t have a candy thermometer https://www.thespruceeats.com/making-candy-without-a-candy-thermometer-520309.
*Note: if using fresh raspberries, up the ¼ cup of milk to ¾ a cup.
Raspberry Meringue Tart
Makes one large tart (25cm across)
Tart Pastry
550g plain flour
50g caster sugar
220g butter
185ml milk
Raspberry Filling
1 cup caster sugar
½ cup corn flour
1 tsp agar agar powder
1 lemon, zested and juiced
200g raspberries, fresh or frozen
¼ cup milk *see note
½ tsp vanilla extract
Meringue
½ cup chickpea liquid (the juice from a can of chickpeas!)
½ tsp cream of tartar60ml water
1 1/2 cup caster sugar
1 tsp agar agar powder
Tart Pastry
Combine the sugar and flour in a large mixing bowl, adding in pieces of the butter and using your fingers to mix them. The result should resemble wet sand.
Make a well in the middle and pour in the milk, mixing until the pastry comes together into a ball.
Wrap in cling wrap and refrigerate for at least 30 minutes before use.
Preheat oven to 160C.
When the dough has had time to rest, prepare a 25cm tart case with cooking spray or butter.
Lightly dust a surface with flour and roll out the pastry dough until it approx. 5mm thick – ensure that the pastry has been rolled out to a sixe wider than the tart case and gently place the pastry into the prepared case, pressing the pastry into the corners. Trim any overhanging edges.
Line the pastry with baking paper, using baking beads or even rice/dried beans to weight it down. Blind bake for 20 minutes and leave to cool.
Raspberry Filling
Place all ingredients into a medium sized saucepan on a medium heat. Ensure that all ingredients have been well mixed together – mashing the raspberries when necessary.
Continue to heat on medium, stirring occasionally until the mixture resembles that of a pudding consistency.
Remove from heat and strain the mix through a fine mesh sieve or some cheesecloth – essentially you’re just trying to get all the seeds from the raspberries out. If you prefer you can totally leave them in.
Pour the raspberry filling into the prepared pastry and refrigerate overnight or at least for three hours (it will take a little while to set properly).
Meringue
Combine the chickpea liquid and the cream of tartar together and beat until stiff peaks form. It will take a few minutes – probably longer if you’re doing this by hand, though it is an amazing workout.
Combine the agar agar, water and sugar together in a small saucepan – heating until it reaches around 112C.
While beating the meringue, slowly pour in the hot sugar mixture, continuing to beat for the next 8 minutes or so – until the meringue has cooled.
When the meringue is ready, you can either use a piping bag or just a spoon to pop the meringue on top of the prepared raspberry tart – as much as you like.
A blowtorch is best – but if you don’t have one, like me, you can pop the tart into a low heat oven for a little or even use a few matches (I did this – didn’t work that great).
Leave for about 30 minutes to let the meringue set a little before cutting into the tart. Enjoy!
Mulled Wine | Brambly Hedge
‘Mr Apple and Dusty Dogwood headed the procession, lanterns held high.‘“Roast the chestnuts, heat the wine,‘Pass the cups along the line,‘Gather round, the log burns bright,‘It’s warm as toast inside tonight,”‘Sang the mice as the log came into view.- The Secret Staircase (Brambly Hedge), Jill Barkley
Mr Apple and Dusty Dogwood headed the procession, lanterns held high.
‘Roast the chestnuts, heat the wine,
‘Pass the cups along the line,
‘Gather round, the log burns bright,
‘It’s warm as toast inside tonight,’
‘Sang the mice as the log came into view.’
The Secret Staircase (Brambly Hedge)
Jill Barklem
My childhood was spent mainly in middle of the bush in country Victoria. The house I grew up in was surrounded by towering gum trees, with paths throughout them clotted with ferns, wattle trees and numerous rabbit, potoroo and bush mice holes that were waiting to trip someone up.
A childhood pastime was to construct tiny houses outside, beneath the overhanging moss on a garden path or within the hollow of a tree that I’d stumbled over. I still enjoy seeing such houses tucked away throughout Melbourne, where I now live. Neighbours whose children have created little faerie or gnome doors built into the sides of trees or bottle tops hanging from branches (so faeries can swing on them - as a young girl solemnly told me when she saw me admiring them).

Brambly Hedge was a children’s book that let my childhood imagine run wild with theories of how all the animals I saw were living when I wasn’t looking. And how apparently they were all incredible cooks. Rose jam? Oat cakes with rowanberry jam? Syllabub and three tiered wedding cakes? Yes please.
I was gifted a copy of The Complete Brambly Hedge for Christmas this year and with my recent page flick through it - my eyes landed very solidly on song above. More specifically - heat the wine. It’s winter in Melbourne, and it seems to just be rapidly getting colder with icy and biting mornings and nights abound. One speciality that Melbourne seems to do particularly well is mulled wine. Every bar appears cosy and inviting with the scent of cinnamon, oranges and various spices drifting out of the doorway. Promising warmth, comfort and a drink that, honestly, feels like a hug.
On the days when my wallet is low and it’s far too hard to put clothes on that aren’t pyjamas I’ve taken to perfecting my own mulled wine recipe. A lot of the stuff in it is quite interchangeable and it’s super fun to play around with the recipe and get a flavour that you really enjoy.
*Note: A fruity wine is best - but honestly, anything is going to taste pretty great when you cook ti with fruit and spices for ages.
Mulled Wine
Serves approx. 12 cups
Ingredients
2 x bottle of red wine *see note
2 tsp fresh grated nutmeg
2 cinnamon sticks
10 star anise
2 tsp cloves
1 1/2 cup apple juice
1 apple, chopped into largish chunks
1 orange
1/2 cup brandy *optional
Using a sharp knife, very carefully cut away the zest of the orange until you have around 4-5 strips. The remainder of the orange can be sliced up thinly to be used in the wine later.
Place all the spices, the strips of orange zest and the apple juice into a large saucepan and heat on medium until lightly simmering.
Add in the chunks of apple, orange slices and both bottles of wine.
Leave it to remain on a medium heat - you don’t want it to burn. When the wine begins to simmer and the scent of the spices being to drift from the saucepan you’ll know its ready.
If you decide to pop some brandy in - do it around this point, and leave it to heat in the wine for another few minutes.
You can either strain all the wine into a new saucepan if you’re planning to have it all at once - or simply strain it off glass by glass (it doesn’t do it any harm with the spices remaining in it). Enjoy hot!
Butter Poached Radishes | The Tale of Peter Rabbit
"First he ate some lettuces and some French beans; and then he ate some radishes; and then, feeling rather sick, he went to look for some parsley."- The Tale of Peter Rabbit, Beatrix Potter
First he ate some lettuces and some French beans; and then he ate some radishes; and then, feeling rather sick, he went to look for some parsley.
The Tale of Peter Rabbit
Beatrix Potter
I can’t seem to stop falling down this nostalgia rabbit hole. Every single Beatrix Potter tale I read is bringing back a fresh wave of memories from my childhood days. So much that I’ve booked in to get a little tattoo done of Benjamin Bunny himself, my favourite character from any of the woodland animal tales.
I’m quite nicely situated in Melbourne, in a beautiful suburb within walking distance to the city. It has the fortune of hosting a local farmer’s market every Sunday that is worth a stroll through even if you don’t really need anything. I always find myself picking up the oddest vegetables and having to experiment with them later on. Which has resulted in realising that spaghetti squash is so delicious and I’m so bitter that barely anywhere in Melbourne seems to ever have it in stock.

Last Sunday I picked up some heirloom tomatoes, a rainbow mixture of zucchinis and some crisp radishes. Instantly my mind went back to The Tale of Peter Rabbit, and Peter’s foray of thievery through Mr. McGregor’s garden. I’ve already made some blackberry and apple muffins inspired by the children’s story - but the radishes drew out a more savoury option.
These butter poached radishes are a perfect accompaniment to a meal, as a side or even just a snack. They are so delicious with a sprinkle of salt and pepper.
Butter Poached Radishes
Serves 5 as a side dish
Ingredients
10 - 12 radishes, with the stems and greens cut off
1 cup melted butter
1 - 2 cups water
Sea salt
Black pepper
Arrange the radishes into a thick bottomed pan and pour in the melted butter and enough of the water so that the radishes are just covered.
Sprinkle liberally with salt and pepper.
Bring the pan to a boil and then reduce to a low heat to continue simmering. Have a little taste of the poaching liquid at this time and add in more salt or pepper if necessary.
Allow to simmer for approximately 10 - 15 minutes or until radishes are soft and losing their bright red colour (though, mine did not really for some reason). During this time remember to turn the radishes in the pan so all sides poach evenly.
Serve the radishes with a little of the poaching liquid and a sprinkle of salt. Best served straight away!
Pasta Puttanesca | The Bad Beginning
"For most of the afternoon, Violet, Klaus, and Sunny cooked the puttanesca sauce according to the recipe. Violet roasted the garlic and washed and chopped the anchovies. Klaus peeled the tomatoes and pitted the olives. Sunny banged on a pot with a wooden spoon, singing a rather repetitive song she had written herself. And all three of the children felt less miserable than they had since their arrival at Count Olaf's."- A Bad Beginning (A Series of Unfortunate Events), Lemony Snicket
For most of the afternoon, Violet, Klaus, and Sunny cooked the puttanesca sauce according to the recipe. Violet roasted the garlic and washed and chopped the anchovies. Klaus peeled the tomatoes and pitted the olives. Sunny banged on a pot with a wooden spoon, singing a rather repetitive song she had written herself. And all three of the children felt less miserable than they had since their arrival at Count Olaf's.
The Bad Beginning (A Series of Unfortunate Events)
Lemony Snicket
The intenseness of the Christmas holidays is finally wearing off and I've found myself with time to actually write up some of these recipes I've had waiting. Working in hospitality is both quite lovely and also so awful around the holiday time, while everyone is in a great mood and customers are delightful, I always find myself working a ridiculous amount - coming home and binging on Netflix and leftovers.So it was quite nice that Netflix released the new season of A Series of Unfortunate Events, it really reminded me that I had quite a few blog posts and recipes piled up on here on draft that had to be finalised and published. And this is one such recipe, probably one of the more notable and memorable foods from the beginning of the dismal series. The Baudelaire Orphans cook Pasta Puttanesca for Count Olaf and his troupe of performers - it maybe didn't go down quite so well with them, however, it is indeed delicious and super easy to make.

*Notes: the chilli is optional depending on whether or not you like a bit of heat. I also omitted anchovies, because I don't eat meat, I don't really think you lose anything by not putting them in, but if you want obviously feel free to put in 3-4 finely chopped anchovies. If you do not have a food processor also - you can simply mix the flours and water together by hand.
Pasta Puttanesca
Ingredients
Pasta (serves just so many, I had pasta for days guys, and no matter how many times I tried to make less it didn’t happen. Or let’s say, 8.)
1 1/2 cups of Tipo 00 flour + extra for dusting
1 cup semolina flour
1 tbsp olive oil
1 - 1 1/2 cups of hot water
Sea salt
Fresh black pepper
Puttanesca Sauce (serves 4)
4 cloves of garlic, sliced finely
2 tbsp capers, drained
1/4 cup black olives, pitted and sliced
5-6 large ripe tomatoes, diced and squished a little
1 red chilli, sliced finely *optional
Handful of roughly chopped flat leaf parsley
1 tbsp olive oil
Fresh black pepper
Sea Salt
Pasta
To make the pasta place both flours in a food processor (*see note) and briefly pulse to combine - add in a few cracks of black pepper and about 1/4 teaspoon of sea salt. Turn on food processor again and slowly add in the oil and hot water while running - it will combine slowly until it forms a giant ball of dough.
Remove the dough and flatten out as best as possible before cutting into quarters. Cover with a clean towel and leave to sit for 10 - 15 minutes.
If you’re planning on cooking straight away, this is a good time to get a large pot of salted water on to the stove to boil.
While resting the dough prepare a clean large area with a dusting of flour in preparation of rolling out your pasta. Doing each quarter of the dough at a time, use a rolling pin to roll out the pasta as thin as possible. I made this a few times - and trust me, as thin as possible still ended up being quite thick once cooked - so definitely go overboard in the rolling out of the dough. Having a pasta maker will entirely help with this step.
Once rolled out, cut into thin strips of whatever width you particularly feel like, I would recommend hanging the pasta once it’s cut, I just improvised something with a cooling rack, it will just help stop the pasta strands from sticking together. Repeat with the rest of the dough till it’s all done.
Cook the noodles a few batches at a time for about 3-5 minutes each and drain and toss amount desired with your puttanesca sauce.
Puttanesca
Heat olive oil in a large frying pan, when hot add in diced tomatoes with a pinch of sea salt, making sure to keep them moving in the pan to prevent them burning. Add in olives, capers, chilli and garlic and cook for another minute, mixing them with the tomatoes as best as possible.
Remove from heat and season with fresh black pepper, add in the chopped parsley and mix through before serving with your fresh made pasta.